
You just bought a new PC. You take it home, fire it up, and stare at the familiar-yet-unfamiliar desktop. How can you get your computer optimized from the start? Just follow this guide to make Windows more productive and secure!
First things to do with your new Windows 10 PC
1. Tame Windows Update
Windows 10 takes care of itself via Windows Update. But the message “Windows is installing updates, don’t turn off your PC” is one of the biggest barriers to productivity in the workplace. When the updates are relatively small, they won’t disrupt your workflow for more than a minute.
If your PC was off while you were on vacation, there might be a major update or a lot of minor updates. This can prevent you from using your PC for about 20 minutes or more. Here’s your solution: You need to tame Windows Update so that every time you return to your PC, it is always updated and ready to go.
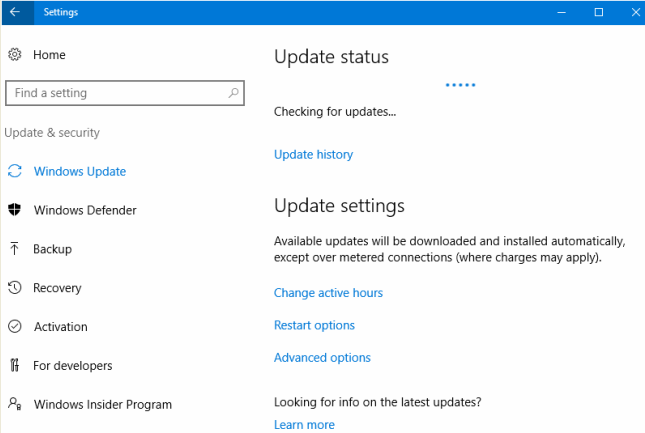
When you open “Windows Update” from the “Settings” app, you can see the “Change active hours” link. Here, you may tell Windows Update the hours that you work
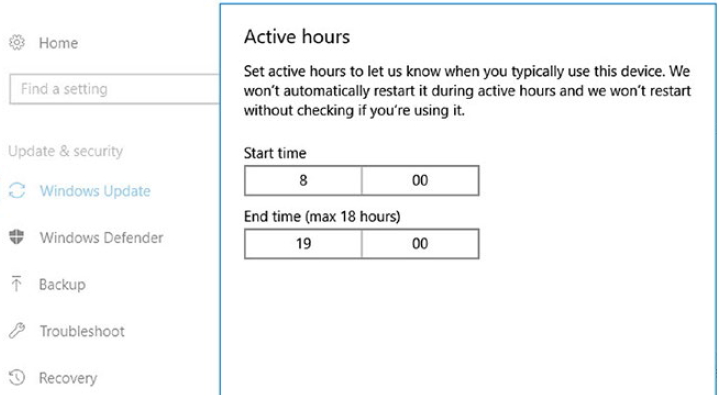
If an update restart is required, Windows will not restart automatically without checking that you are using the PC.
2. Install required software
For necessary software like browsers, media players, etc, you can use Ninite. This free software automates everything and installs common software with just a single click.
Click the link above to learn more. With Ninite, simply check the boxes for the apps you need and download your custom installer. The program will download and install all your programs directly from the makers, eliminating any nasty toolbars. Ninite will prevent you from downloading something you never wanted in the first place.
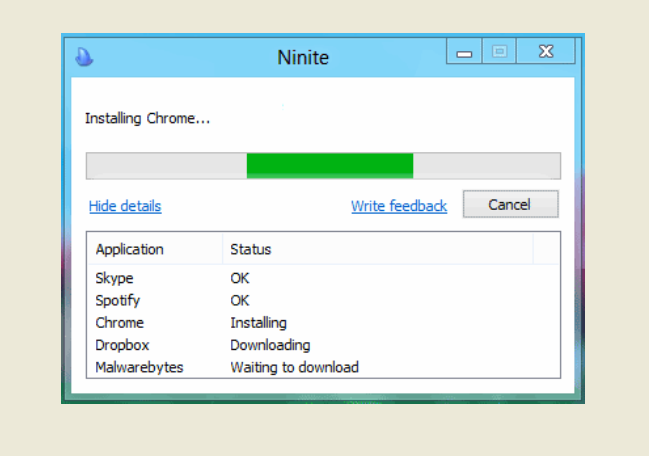
Ninite lets you install numerous free applications of your choice all at once. It automatically disables the bundled bloatware that many free programs try to sneak in.
3. Display Settings
Your eyes were not created to stare directly at a light source for most of the day. At night, staring at a screen can disrupt your sleep patterns. Night light is a mode that changes the colors into warmer versions. It actually minimizes irritating blue light to a great extent.
Go to Start menu -> Settings and open System panel. Go to the Display section. Click on Color and turn on the “Night light” switch. By default, the night light mode will be scheduled to activate between sunset and sunrise. You can also customize the intensity of the night light.
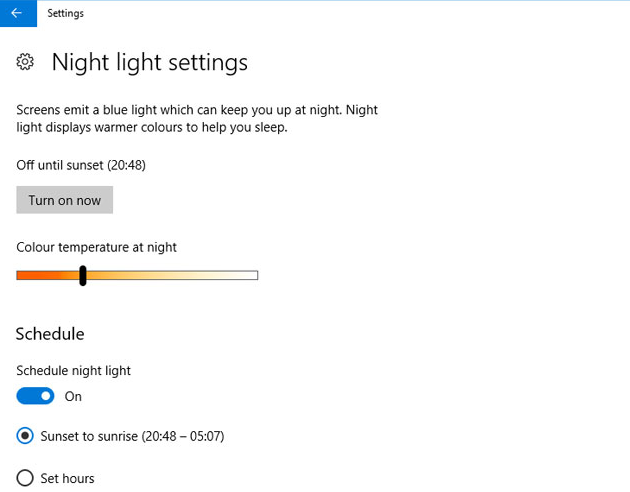
To make effective changes, click on “Night light settings” right under the “Night light” switch. Here you can manually adjust the color temperature and schedule your night light hours. You can make your screen display yellowish colors by dragging the slider “Color temperature at night” to the right or left.
4. Set Your Default Browser
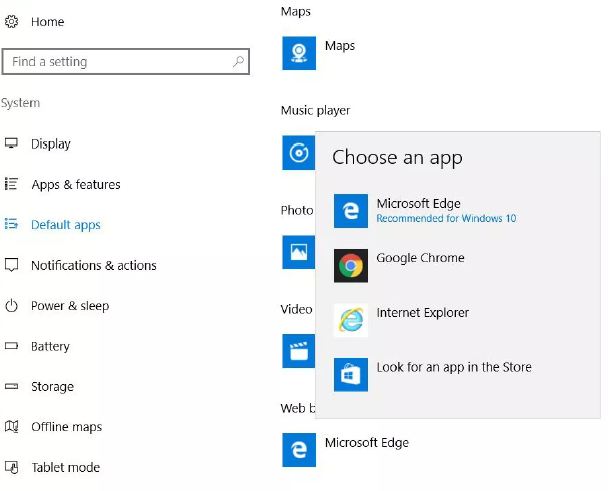
If you want to use Firefox, Chrome, or any browser other than Microsoft’s Edge, you can install it yourself and make it your default browser. After installing Chrome (as discussed in section 2), the first time you launch it, it will ask if you want to set it as the default browser. If you miss it, you can go to Settings -> System -> Default apps, and click Microsoft Edge in the “Web browser” section to make a different selection.
5. Manage Notifications
There is more you can do to configure notifications accessed through the System settings.
The “Notifications & actions” panel in the “System” settings allows you control and tame all notifications, and notifications from individual apps and programs.
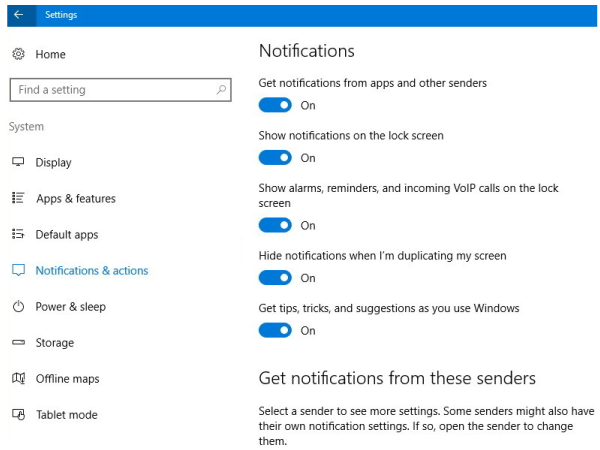
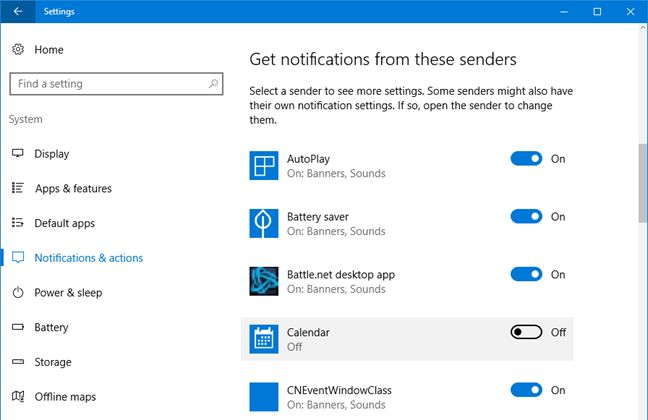
The first option “Get notifications from apps and other senders” allows you to turn all app and program notifications on or off globally. This is the switch use if you don’t want to be bothered by notifications. Scroll down the list and you will see On/Off switches for every app and program installed on the PC that can create alerts. For instance, if Adobe Creative Cloud is annoying you, turn off their notifications completely.
6. Turn Cortana Off
Cortana is a very useful digital assistant. But it has to know things about you to perform the job well. You have a number of options for handling that, from stopping some of its information gathering to turning it off completely.
Cortana is a very useful digital assistant. But it has to know things about you to perform the job well. You have a number of options for handling that, from stopping some of its information gathering to turning it off completely.
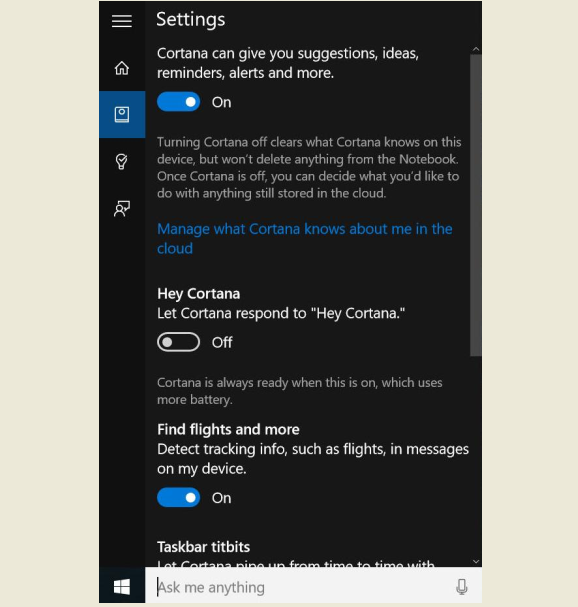
Click in the Cortana search box on the lower left of the screen, then click the notebook icon from the menu that appears (third icon from the top), and click Settings. Move the top slider from On to Off. This will stop Cortana from gathering information about you.
7. Turn Game Mode On
One of the most captivating features of Windows 10 (especially for gamers) is to improve performance by reallocating CPU and RAM resources from potentially laborious tasks running in the background.
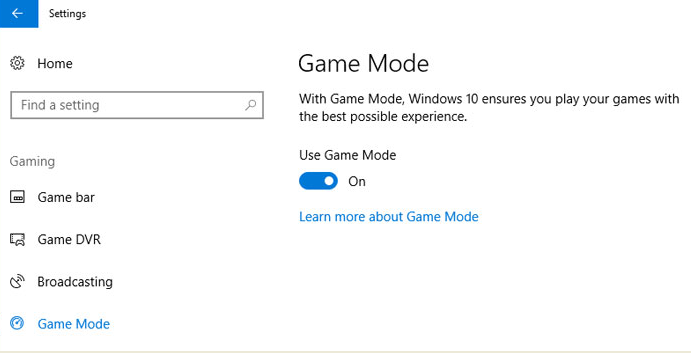
A Windows 10 user may see a good 10 percent increase or more in FPS by keeping apps running in the background while gaming. Also, the minimum frame rates are significantly higher. To turn it on, go to Settings panel -> Gaming -> Game Mode, then toggle the slider to On.
8. User Account Control Settings
Click on Start, choose Search, type in UAC and then click on “Change User Account Control settings.” Here, you can increase the intensity level by moving the slider to the “Always notify” option. When you visit a sketchy website, this is a very good option. UAC can monitor all the changes that are going to be made to your PC. If your user account is infected with malware, UAC keeps suspicious programs from making changes on the system.
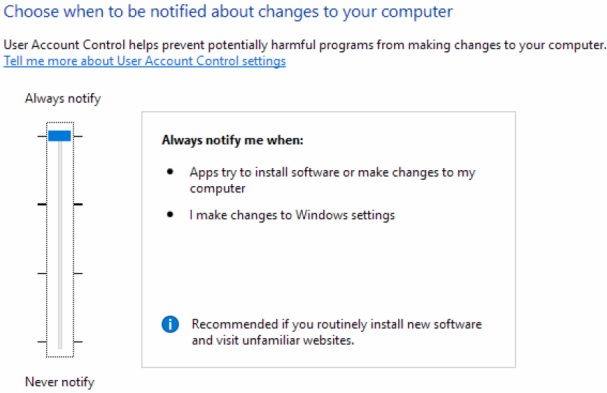
Note: Many users have the tendency to turn off User Account Control. Instead of disabling the UAC, you may decrease the intensity level using a slider.
9. Privacy Settings
Microsoft collects telemetry and other data. Windows usually assigns an advertising ID to every user to provide tailored ads. The company also collects and synchronizes user data with its servers. So you need to ensure that the privacy preferences are set properly.
The advertising ID doesn’t just gather your information when you browse, but also when you use Windows 10 apps. In order to protect your privacy and to turn that advertising ID off, launch the Settings app by clicking on the Start button, and go to Privacy -> General. There you can see a list of choices under “Change privacy options.” The first choice controls the advertising ID. Just move the slider from On to Off. You may also restrict access to your microphone and camera in Privacy section.

You can make use of third party privacy programs like W10Privacy. It offers options such as killing Wi-Fi sharing, changing telemetry settings, and blocking servers.
10. Windows Defender Settings
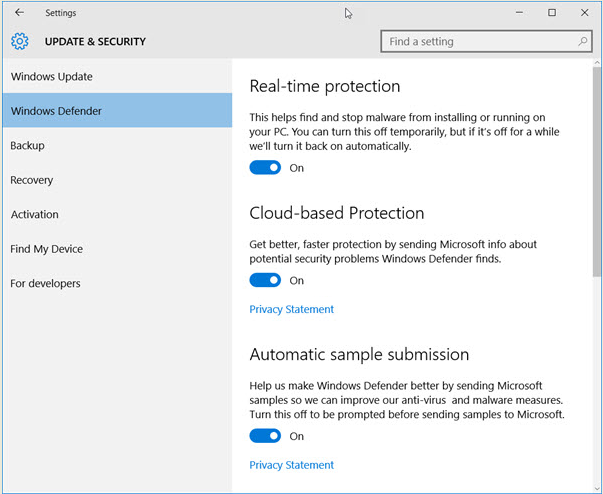
Windows 10 ships with Windows Defender. It is a solid security solution that is easy to use and probably good enough for most users. Click on Start, then Settings, and then UPDATE & SECURITY. Click on Windows Defender and ensure the following three settings are enabled: Real-time protection, Cloud-based protection, and Automatic sample submission. Windows Defender does a great job of protecting your PC and it is built right into Windows.
Note: Malwarebytes Anti-Malware is one of the best tools for repairing malware infections. It includes anti-malware, anti-spyware and anti-rootkit protection. You can download it here:
11. Kill Bloatware
Boxed PCs from big computer companies are brimming with bloatware. Windows PCs sold at mass market retailers will have more bloatware than those sold at specialty retailers. Adware is a type of bloatware that pumps advertisements. It slows your PC down, can spy on you, and expose your PC to dangers.
So it’s a good idea to use either of these 2 apps:
These apps can tell you what unfamiliar programs do and how many other users uninstalled them.
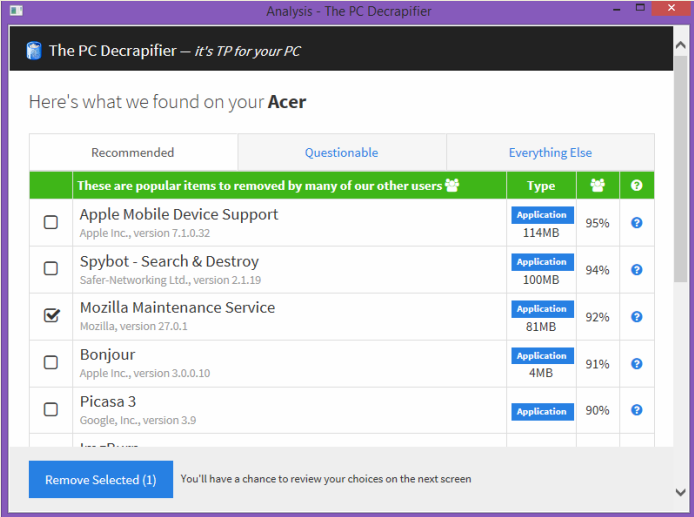
Recommended – List of programs that the tool recommends you to uninstall
Questionable – List of programs you may uninstall
Everything Else – List of programs that the tool isn’t sure about
12. Anti-ransomware Protection
In the fight against ransomware, Windows Defender gets a new weapon.
Go to Windows Defender Security Center -> Virus & threat protection -> Virus & threat protection settings.
Now you will be able to toggle on and off “Controlled folder access” button. Here, some folders are protected by default. Users can add few more to the list of “Protected folders”.
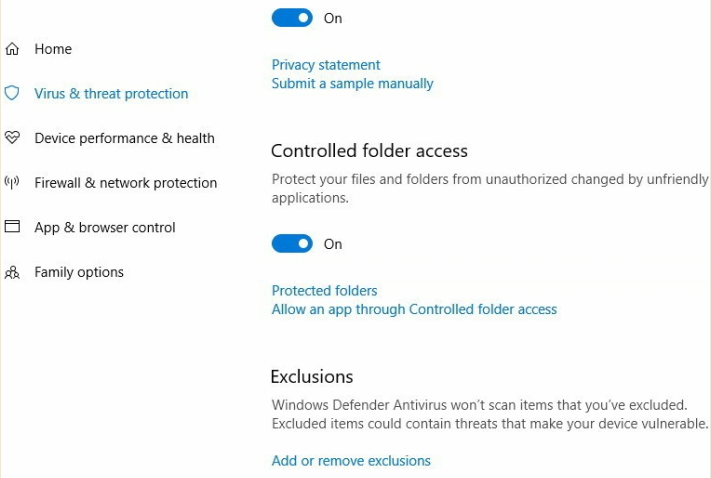
If the setting is grayed out, you may need to uninstall the trial version of another security application that came pre-installed on your PC.
13. Create a Windows Recovery Drive
A Recovery Drive has the ability to boot your system and easily access a number of tools to revive a failing Windows PC. If you wish to run System Restore but can’t get access to the Windows desktop, you can do this from a USB recovery drive. You just need a USB flash drive of at least 4GB to create this. In the Start menu, search for recovery, and open the Recovery option.
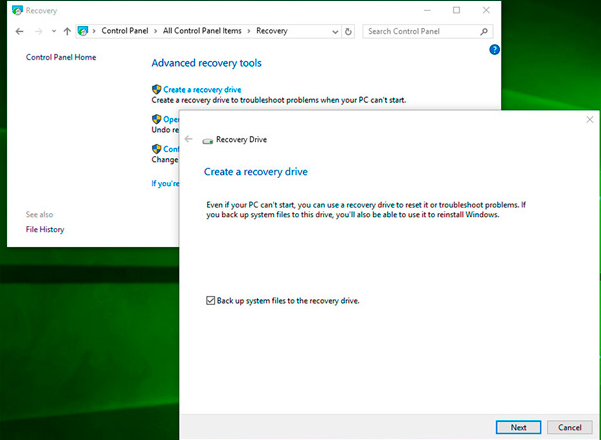
A window appears and the first option is “Create a recovery drive.” Click this option and a wizard appears on the screen. This can guide you through the process of creating a USB recovery drive. The drive can be used to start the PC into the recovery environment.
Note: A recovery drive is essential, and it is recommended that you create one for each PC. As Windows editions tend to vary, not all recovery drives can be used to rescue all versions of Windows. Also, remember that if you create a Recovery Drive in a 32-bit version of Windows, then you can’t use that drive for a 64-bit version.
So there you have it. If you’ve followed our guide, you’re ready to use your new computer to its full potential. Start working, playing, or playing while you should be working!
Boxed PCs from big computer companies are brimming with bloatware. Windows PCs sold at mass market retailers will have more bloatware than those sold at specialty retailers. Adware is a type of bloatware that pumps advertisements. It slows your PC down, can spy on you, and expose your PC to dangers.
So it’s a good idea to use either of these 2 apps:
These apps can tell you what unfamiliar programs do and how many other users uninstalled them.

Recommended – List of programs that the tool recommends you to uninstall
Questionable – List of programs you may uninstall
Everything Else – List of programs that the tool isn’t sure about
12. Anti-ransomware Protection
In the fight against ransomware, Windows Defender gets a new weapon.
Go to Windows Defender Security Center -> Virus & threat protection -> Virus & threat protection settings.
Now you will be able to toggle on and off “Controlled folder access” button. Here, some folders are protected by default. Users can add few more to the list of “Protected folders”.

If the setting is grayed out, you may need to uninstall the trial version of another security application that came pre-installed on your PC.
13. Create a Windows Recovery Drive
A Recovery Drive has the ability to boot your system and easily access a number of tools to revive a failing Windows PC. If you wish to run System Restore but can’t get access to the Windows desktop, you can do this from a USB recovery drive. You just need a USB flash drive of at least 4GB to create this. In the Start menu, search for recovery, and open the Recovery option.

A window appears and the first option is “Create a recovery drive.” Click this option and a wizard appears on the screen. This can guide you through the process of creating a USB recovery drive. The drive can be used to start the PC into the recovery environment.
Note: A recovery drive is essential, and it is recommended that you create one for each PC. As Windows editions tend to vary, not all recovery drives can be used to rescue all versions of Windows. Also, remember that if you create a Recovery Drive in a 32-bit version of Windows, then you can’t use that drive for a 64-bit version.
So there you have it. If you’ve followed our guide, you’re ready to use your new computer to its full potential. Start working, playing, or playing while you should be working!


No comments:
Post a Comment