
Over two years have passed since the launch of Windows 10, and well over half a billion devices have the operating system software installed. There have been a lot of improvements in security over earlier versions of Windows, but as is the case with all software, vulnerabilities exist.
While experts continue to find security issues in Windows 10 itself, other issues come from the interaction of devices, applications and cloud services.
With some features like speech recognition and personalized services, the issue isn’t always that there’s an immediate security threat; the issue revolves around what level of privacy the user expects, and how to protect personal information.
Taking control over Windows 10 features can help prevent some common security issues. Some of the basics of securing your system, based on Windows 10 Home Edition Fall Creators Update (version 1709, 2017) are the same, but there are also some new additions worth looking into. First, the familiar – Windows Hello and the startup screen you get after booting up your computer.
3 ways to secure Windows 10
Hello, who are you? Using passwords and lockscreens
The convenience of tablets, notebooks, and other mobile devices is undeniable. There are more than three times as many notebooks and tablets sold every year, compared to desktop PCs. Given that people use their devices in public places like coffee shops and shared workplaces, using passwords and lockscreens is essential to keeping Windows 10 devices locked down from unauthorized use.
Since the introduction of Windows 10, Windows Hello has offered the ability to use facial recognition technology in place of passwords and fingerprint readers that come on some computers. It’s definitely convenient, but consider that there might be a risk – perhaps slight – that the system can be tricked. Researchers have shown that the facial recognition technology in versions of Windows 10 prior to Windows Fall Creators Update (build 1703 or 1709) can be tricked into authenticating the user by using a photo of the user placed in front of the device’s camera.
Even if you’ve upgraded to the latest build, be sure to set up Windows Hello again to ensure that you’re using the most up-to-date settings and data.
Setting up Windows Hello
To set up Windows Hello with biometric recognition, check first to see if your device is supported. Some devices and applications are listed on this Microsoft website.
Select the Start button, then select Settings > Accounts > Sign-in options to get ready to set up Windows Hello. In the Windows Hello box, there are options for face, fingerprint, or iris scans if your PC has a fingerprint reader or a camera that supports these functions.
If you prefer to be a bit more old-fashioned or, as is the case with our test computer, your device doesn’t support Windows Hello,then make sure to set up a password or PIN.
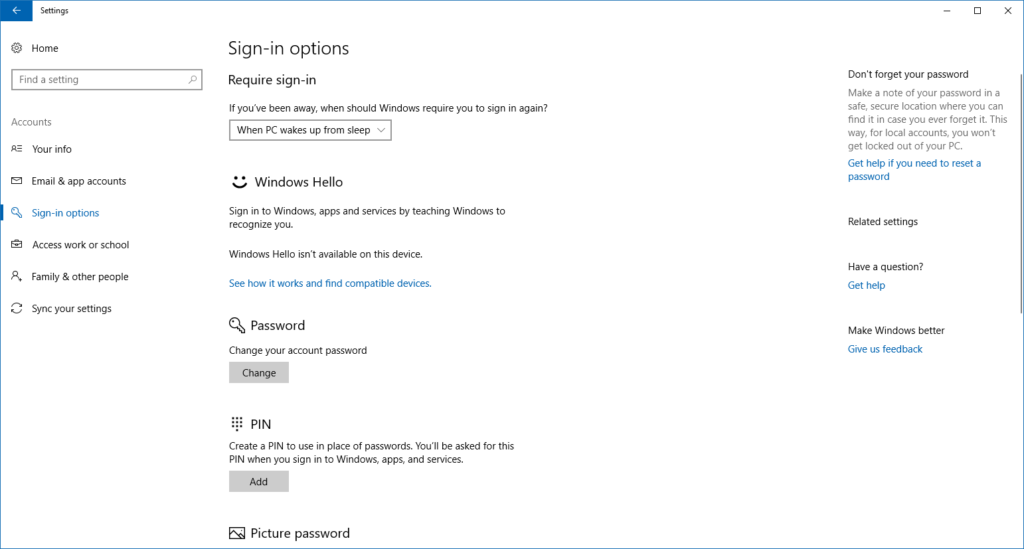
Don’t forget to set the option to Require sign-in for When PC Wakes from sleep. That will ensure that an unauthorized user can get access after you’ve stepped away from your device.
Windows Defender offers unified view of security
Windows Defender is still the central location for security functions, with the addition of a relatively new feature called Controlled folder access. It might not sound like a security feature, but it was added to address the growing problem of ransomware. What is ransomware? It is essentially a form of malware whose purpose is to extort money from the victim by “locking” files using encryption and preventing the user from accessing her machine.
Using Controlled folder access
Controlled folder access is designed to prevent unauthorized access to important files. It does this by only allowing authorized applications to access data. Malicious files and scripts are denied access to folders, and Windows shows an alert when an unapproved application attempts to access or modify your files.
To turn on the feature, start by opening the Windows Defender Security center by clicking the shield icon in the task bar. Next, click the Virus and threat protection icon on the left side menu bar or its tile to the right.
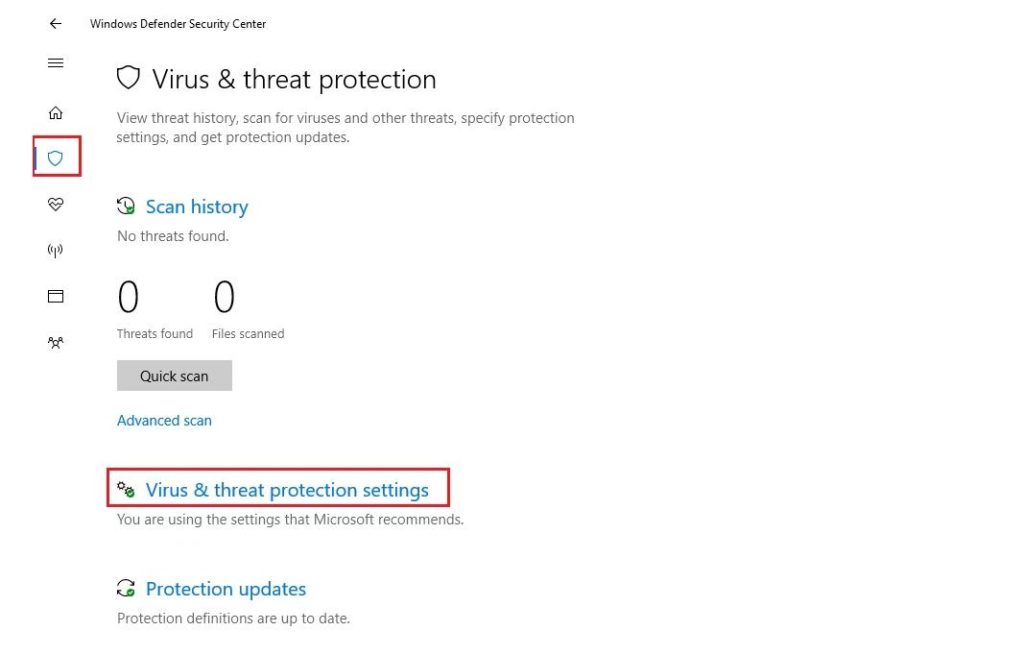
The window will show a switch for Controlled folder access, which you can now turn On.
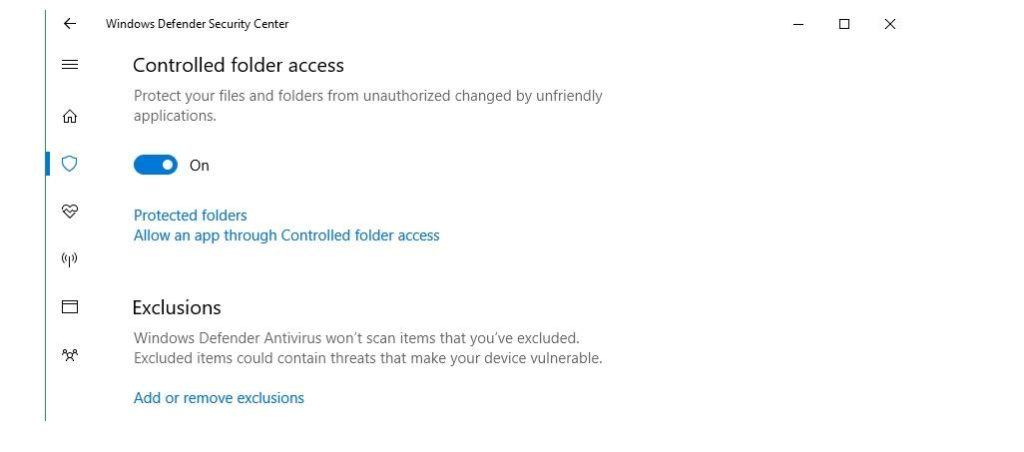
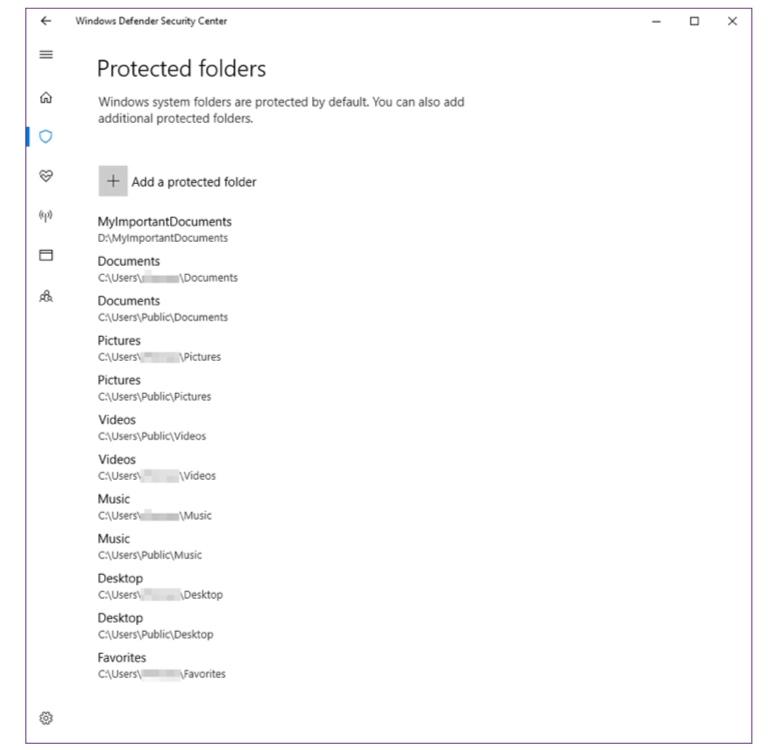
Most commonly used folders are protected, including Documents, Pictures, Music, and Videos. If you want to add other folders, including those on external drives, click on Add a protected folder and name the path to be protected.
If an unauthorized application tries to access or modify files in the protected folders, this warning is displayed:
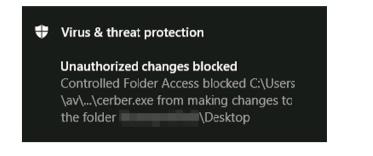
Source : Microsoft
Taming the unwanted software install beast
Criminals aren’t the only ones trying to install malware on your computer. Sometimes, users such as young children can inadvertently install applications that cause problems. Another step for locking down Windows 10 is to change permission on which apps can get installed on the computer. With Windows 10 Creators Update, there is an option to only allow software from the Windows Store to be installed.
Setting App download permission
To set download permission, go to Settings > Apps & Features. At the top of the window, you will see the Installing Apps setting. There are three choices. Allow apps from anywhere is the default choice, but if there are young or less tech-savvy users you should consider enabling the Warn me before installing apps from outside the Store option.
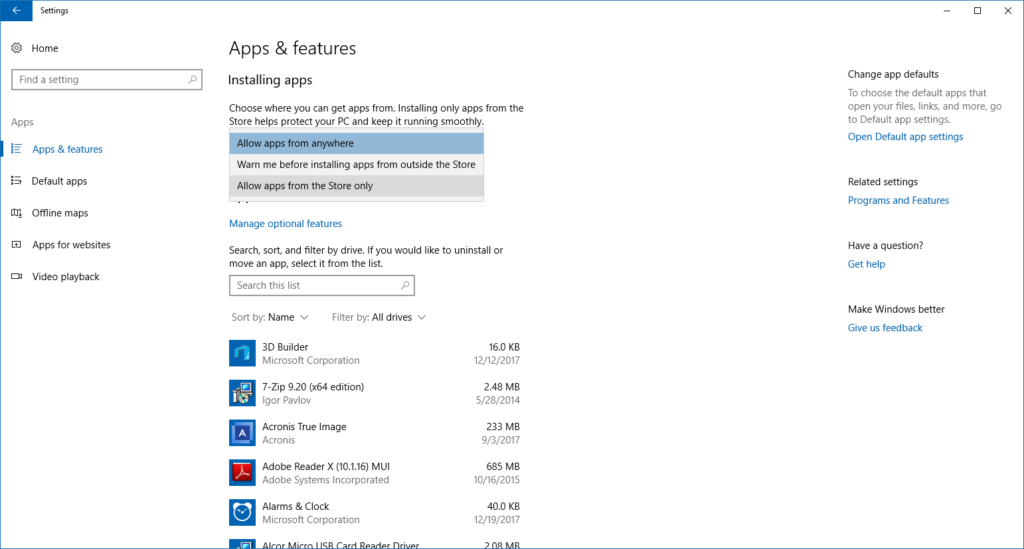
This will show a warning before the installation can proceed. As long as you have set a separate account where there is only one user with administrator privileges, the other standard user accounts will need permission from the administrator to continue.
The setting for Allow apps from the Store only promises to offer an additional level of security, in that Microsoft is doing more to check the authenticity and trustworthiness of software in its store. Even apps that are checked might have security flaws, but at least (hopefully) most malicious apps will be filtered out.

No comments:
Post a Comment